Simulating a CockroachDB cluster can be an incredibly useful tool for testing, training, and development work. It's an easy process that you can perform directly on localhost using Docker. Today's blog post is a tutorial by Cockroach Labs enterprise architect Fabio Ghirardello on how to simulate a multi-region CockroachDB cluster on localhost.
Here are the instructions to simulate the deployment of a 9 nodes CockroachDB cluster across 3 regions on localhost using Docker. The instructions assume you are running Linux or macOS, although it should work on Windows using Cygwin, and have Docker installed.
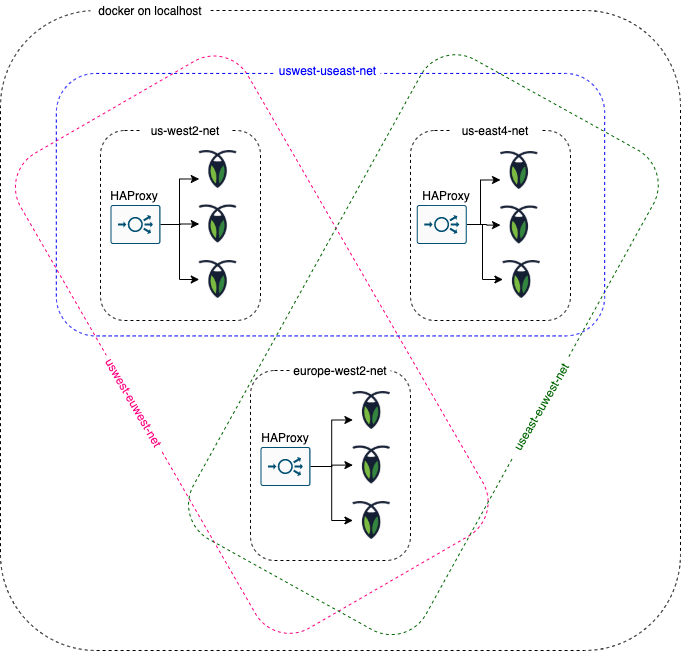
Below is the high level architecture diagram. Each region will host 3 nodes:
region
us-west2hosts nodesroach-seattle-1|2|3;region
us-east4hosts nodesroach-newyork-1|2|3region
eu-west2hosts nodesroach-london-1|2|3
Configure Your Simulated Multi-Region Cockroach Setup with Docker
First, you'll need to create the required networks. We'll create 1 network for each region, plus 1 network for each inter-regional connection.
# region networks
docker network create --driver=bridge --subnet=172.27.0.0/16 --ip-range=172.27.0.0/24 --gateway=172.27.0.1 us-west2-net
docker network create --driver=bridge --subnet=172.28.0.0/16 --ip-range=172.28.0.0/24 --gateway=172.28.0.1 us-east4-net
docker network create --driver=bridge --subnet=172.29.0.0/16 --ip-range=172.29.0.0/24 --gateway=172.29.0.1 eu-west2-net

# inter-regional networks
docker network create --driver=bridge --subnet=172.30.0.0/16 --ip-range=172.30.0.0/24 --gateway=172.30.0.1 uswest-useast-net
docker network create --driver=bridge --subnet=172.31.0.0/16 --ip-range=172.31.0.0/24 --gateway=172.31.0.1 useast-euwest-net
docker network create --driver=bridge --subnet=172.32.0.0/16 --ip-range=172.32.0.0/24 --gateway=
172.32.0.1 uswest-euwest-net
Each node is associated to its own region network, which will attach to the docker instance eth0 NIC. We also specify the node IP address with the --ip flag and the IP addresses of all nodes in its region using the --add-host flag. This will create an entry in the docker instance /etc/hosts file, which has precedence over DNS lookups (this will become very important in a bit!)
Create the haproxy.cfg files for the HAProxy in each region.
# us-east4
mkdir -p data/us-east4
cat - >data/us-east4/haproxy.cfg <<EOF

global
  maxconn 4096

defaults
    mode                tcp
    # Timeout values should be configured for your specific use.
    # See: https://cbonte.github.io/haproxy-dconv/1.8/configuration.html#4-timeout%20connect
    timeout connect     10s
    timeout client      1m
    timeout server      1m
    # TCP keep-alive on client side. Server already enables them.
    option              clitcpka

listen psql
    bind :26257
    mode tcp
    balance roundrobin
    option httpchk GET /health?ready=1
    server cockroach1 roach-newyork-1:26257 check port 8080
    server cockroach2 roach-newyork-3:26257 check port 8080
    server cockroach3 roach-newyork-2:26257 check port 8080

EOF

# us-west2
mkdir data/us-west2
cat - >data/us-west2/haproxy.cfg <<EOF

global
  maxconn 4096

defaults
    mode                tcp
    # Timeout values should be configured for your specific use.
    # See: https://cbonte.github.io/haproxy-dconv/1.8/configuration.html#4-timeout%20connect
    timeout connect     10s
    timeout client      1m
    timeout server      1m
    # TCP keep-alive on client side. Server already enables them.
    option              clitcpka

listen psql
    bind :26257
    mode tcp
    balance roundrobin
    option httpchk GET /health?ready=1
    server cockroach4 roach-seattle-1:26257 check port 8080
    server cockroach5 roach-seattle-2:26257 check port 8080
    server cockroach6 roach-seattle-3:26257 check port 8080

EOF

# eu-west2
mkdir data/eu-west2
cat - >data/eu-west2/haproxy.cfg <<EOF

global
  maxconn 4096

defaults
    mode                tcp
    # Timeout values should be configured for your specific use.
    # See: https://cbonte.github.io/haproxy-dconv/1.8/configuration.html#4-timeout%20connect
    timeout connect     10s
    timeout client      1m
    timeout server      1m
    # TCP keep-alive on client side. Server already enables them.
    option              clitcpka

listen psql
    bind :26257
    mode tcp
    balance roundrobin
    option httpchk GET /health?ready=1
    server cockroach7 roach-london-1:26257 check port 8080
    server cockroach8 roach-london-2:26257 check port 8080
    server cockroach9 roach-london-3:26257 check port 8080

EOF
Next, create the Docker containers:
# Seattle
docker run -d --name=roach-seattle-1 --hostname=roach-seattle-1 --ip=172.27.0.11 --cap-add NET_ADMIN --net=us-west2-net --add-host=roach-seattle-1:172.27.0.11 --add-host=roach-seattle-2:172.27.0.12 --add-host=roach-seattle-3:172.27.0.13 -p 8080:8080 -v "roach-seattle-1-data:/cockroach/cockroach-data" cockroachdb/cockroach:v20.1.5 start --insecure --join=roach-seattle-1,roach-newyork-1,roach-london-1 --locality=region=us-west2,zone=a
docker run -d --name=roach-seattle-2 --hostname=roach-seattle-2 --ip=172.27.0.12 --cap-add NET_ADMIN --net=us-west2-net --add-host=roach-seattle-1:172.27.0.11 --add-host=roach-seattle-2:172.27.0.12 --add-host=roach-seattle-3:172.27.0.13 -p 8081:8080 -v "roach-seattle-2-data:/cockroach/cockroach-data" cockroachdb/cockroach:v20.1.5 start --insecure --join=roach-seattle-1,roach-newyork-1,roach-london-1 --locality=region=us-west2,zone=b
docker run -d --name=roach-seattle-3 --hostname=roach-seattle-3 --ip=172.27.0.13 --cap-add NET_ADMIN --net=us-west2-net --add-host=roach-seattle-1:172.27.0.11 --add-host=roach-seattle-2:172.27.0.12 --add-host=roach-seattle-3:172.27.0.13 -p 8082:8080 -v "roach-seattle-3-data:/cockroach/cockroach-data" cockroachdb/cockroach:v20.1.5 start --insecure --join=roach-seattle-1,roach-newyork-1,roach-london-1 --locality=region=us-west2,zone=c
# Seattle HAProxy
docker run -d --name haproxy-seattle --ip=172.27.0.10 -p 26257:26257 --net=us-west2-net -v `pwd`/data/us-west2/:/usr/local/etc/haproxy:ro haproxy:1.7

# New York
docker run -d --name=roach-newyork-1 --hostname=roach-newyork-1 --ip=172.28.0.11 --cap-add NET_ADMIN --net=us-east4-net --add-host=roach-newyork-1:172.28.0.11 --add-host=roach-newyork-2:172.28.0.12 --add-host=roach-newyork-3:172.28.0.13 -p 8180:8080 -v "roach-newyork-1-data:/cockroach/cockroach-data" cockroachdb/cockroach:v20.1.5 start --insecure --join=roach-seattle-1,roach-newyork-1,roach-london-1 --locality=region=us-east4,zone=a
docker run -d --name=roach-newyork-2 --hostname=roach-newyork-2 --ip=172.28.0.12 --cap-add NET_ADMIN --net=us-east4-net --add-host=roach-newyork-1:172.28.0.11 --add-host=roach-newyork-2:172.28.0.12 --add-host=roach-newyork-3:172.28.0.13 -p 8181:8080 -v "roach-newyork-2-data:/cockroach/cockroach-data" cockroachdb/cockroach:v20.1.5 start --insecure --join=roach-seattle-1,roach-newyork-1,roach-london-1 --locality=region=us-east4,zone=b
docker run -d --name=roach-newyork-3 --hostname=roach-newyork-3 --ip=172.28.0.13 --cap-add NET_ADMIN --net=us-east4-net --add-host=roach-newyork-1:172.28.0.11 --add-host=roach-newyork-2:172.28.0.12 --add-host=roach-newyork-3:172.28.0.13 -p 8182:8080 -v "roach-newyork-3-data:/cockroach/cockroach-data" cockroachdb/cockroach:v20.1.5 start --insecure --join=roach-seattle-1,roach-newyork-1,roach-london-1 --locality=region=us-east4,zone=c
# New York HAProxy
docker run -d --name haproxy-newyork --ip=172.28.0.10 -p 26258:26257 --net=us-east4-net -v `pwd`/data/us-east4/:/usr/local/etc/haproxy:ro haproxy:1.7

# London
docker run -d --name=roach-london-1 --hostname=roach-london-1 --ip=172.29.0.11 --cap-add NET_ADMIN --net=eu-west2-net --add-host=roach-london-1:172.29.0.11 --add-host=roach-london-2:172.29.0.12 --add-host=roach-london-3:172.29.0.13 -p 8280:8080 -v "roach-london-1-data:/cockroach/cockroach-data" cockroachdb/cockroach:v20.1.5 start --insecure --join=roach-seattle-1,roach-newyork-1,roach-london-1 --locality=region=eu-west2,zone=a
docker run -d --name=roach-london-2 --hostname=roach-london-2 --ip=172.29.0.12 --cap-add NET_ADMIN --net=eu-west2-net --add-host=roach-london-1:172.29.0.11 --add-host=roach-london-2:172.29.0.12 --add-host=roach-london-3:172.29.0.13 -p 8281:8080 -v "roach-london-2-data:/cockroach/cockroach-data" cockroachdb/cockroach:v20.1.5 start --insecure --join=roach-seattle-1,roach-newyork-1,roach-london-1 --locality=region=eu-west2,zone=b
docker run -d --name=roach-london-3 --hostname=roach-london-3 --ip=172.29.0.13 --cap-add NET_ADMIN --net=eu-west2-net --add-host=roach-london-1:172.29.0.11 --add-host=roach-london-2:172.29.0.12 --add-host=roach-london-3:172.29.0.13 -p 8282:8080 -v "roach-london-3-data:/cockroach/cockroach-data" cockroachdb/cockroach:v20.1.5 start --insecure --join=roach-seattle-1,roach-newyork-1,roach-london-1 --locality=region=eu-west2,zone=c
# London HAProxy
docker run -d --name haproxy-london --ip=172.29.0.10 -p 26259:26257 --net=eu-west2-net -v `pwd`
/data/eu-west2/:/usr/local/etc/haproxy:ro haproxy:1.7
Now, we'll initialize the cluster:
docker exec -it roach-newyork-1 ./cockroach init --insecure
We then attach each node to the inter-regional networks. These networks will attach to new NICs, eth1 and eth2. We then use tc qdisc to add an arbitrary latency to each new NIC.
Connectivity between nodes in the same region will go through the region network, over eth0, and connectivity among nodes in different regions via the inter-regional network, over eth1 and eth2.
Note: with the connection to the inter-regional networks, the Docker instance internal DNS gets sometimes scrambled up: issuing, say, nslookup roach-seattle-1 from host roach-seattle-2 will resolve to either an IP address from the in-region network or from the inter-regional networks. If the hostname does not resolve to the in-region network IP, traffic will go through eth1 or eth2 which has the latency applied, causing in-region connectivity to look very slow. To resolve such a problem we use static IP addresses added to each node's /etc/hosts file. This makes sure that in-region hostnames resolve to the region IP addresses, forcing the connection to go over eth0 instead of eth1 or eth2.
# Seattle
for j in 1 2 3
do
    docker network connect uswest-useast-net roach-seattle-$j
    docker network connect uswest-euwest-net roach-seattle-$j
    docker exec roach-seattle-$j bash -c "apt-get update && apt-get install -y iproute2 iputils-ping dnsutils"
    docker exec roach-seattle-$j tc qdisc add dev eth1 root netem delay 30ms
    docker exec roach-seattle-$j tc qdisc add dev eth2 root netem delay 90ms
done

# New York
for j in 1 2 3
do
    docker network connect uswest-useast-net roach-newyork-$j
    docker network connect useast-euwest-net roach-newyork-$j
    docker exec roach-newyork-$j bash -c "apt-get update && apt-get install -y iproute2 iputils-ping dnsutils"
    docker exec roach-newyork-$j tc qdisc add dev eth1 root netem delay 32ms
    docker exec roach-newyork-$j tc qdisc add dev eth2 root netem delay 60ms
done

# London
for j in 1 2 3
do
    docker network connect useast-euwest-net roach-london-$j
    docker network connect uswest-euwest-net roach-london-$j
    docker exec roach-london-$j bash -c "apt-get update && apt-get install -y iproute2 iputils-ping dnsutils"
    docker exec roach-london-$j tc qdisc add dev eth1 root netem delay 62ms
    docker exec roach-london-$j tc qdisc add dev eth2 root netem delay 88ms
done
How to license and configure your Cockroach Cluster
You will require an Enterprise license to unlock some of the features described below, like the Map view. You can request a Trial license or, alternatively, just skip the license registration step - the deployment will still succeed.
Open a SQL shell. You can download the cockroachdb binary which includes a built in SQL client or, thanks to CockroachDB's compliance with the PostgreSQL wire protocol, you can use the psql client.
# ----------------------------
# ports mapping:
# 26257: haproxy-seattle
# 26258: haproxy-newyork
# 26259: haproxy-london
# ----------------------------

# use cockroach sql, defaults to localhost:26257
cockroach sql --insecure

# or use the --url param for another host:
cockroach sql --url "postgresql://localhost:26258/defaultdb?sslmode=disable"

# or use psql
psql -h localhost -p 26257 -U
 root defaultdb
Run the below SQL statements:
-- let the map know the location of the regions
UPSERT into system.locations VALUES
        ('region', 'us-east4', 37.478397, -76.453077),
        ('region', 'us-west2', 43.804133, -120.554201),
        ('region', 'eu-west2', 51.5073509, -0.1277583);

SET CLUSTER SETTING cluster.organization = "Cockroach Labs - Production Testing";
-- skip below if you don't have a Trial or Enterprise license
SET CLUSTER SETTING enterprise.license = "xxxx-yyyy-zzzz";
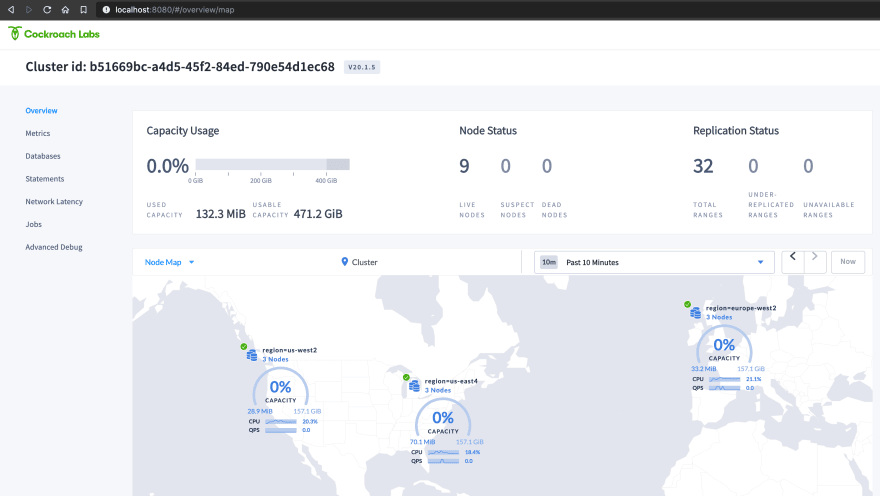
At this point you should be able to view the CockroachDB Admin UI at http://localhost:8080. Check the map and the latency table:
Congratulations, you are now ready to start your dev work on a simulated CockroachDB multi-region deployment!
References
Clean up
When you're done, here's how to stop and remove containers, delete the data volumes, and delete the network bridges:
for i in seattle newyork london
do
    for j in 1 2 3
    do
        docker stop roach-$i-$j
        docker rm roach-$i-$j
        docker volume rm roach-$i-$j-data
    done
done
docker network rm
us-east4-net us-west2-net eu-west2-net uswest-useast-net useast-euwest-net uswest-euwest-net


![[image] finserv use cases](/_next/image/?url=https%3A%2F%2Fimages.ctfassets.net%2F00voh0j35590%2F61herWHcBa8OEwzsV20Vco%2F5971df8ab1da34f54d551ca1383e10ba%2FFinserv_use_cases_Blog_1920x1080__1_.png&w=3840&q=75)

