In this post you’ll learn about the CockroachDB Cloud API and how I’ve used it to create an application Dashboard with Next.js. Using the API you can build a custom interface to meet your organization’s needs, or perform various tasks relating to your database infrastructure.
I’ll also explain how I’ve used NextAuth.js to create conditional authorization rules to facilitate greater control over the functionality.
You can get a feel for what I’ve built using the links below.
But first.
What is an API?
An API is an Application Programming Interface that allows you to programmatically interact with another “computer”. In the case of the CockroachDB Cloud API it allows you to programmatically interact with CockroachDB Cloud’s configuration (that is, either CockroachDB dedicated or CockroachDB serverless). You might be wondering, how is this different from CockroachDB Cloud? — It’s not. Well, it kind of is.
The CockroachDB Cloud Console and functionality have been carefully constructed to meet our customers' most common needs, or in short, it solves for the 80% of use cases.
But, by using the CockroachDB Cloud API you’ll likely get closer to solving 100% of specifically your use cases!
What can you do with the CockroachDB Cloud API?
To give you one example: In the CockroachDB Cloud Console, you’ll see all of your available Clusters together with some information about their details and status.
What you can’t see on this screen is the total spend limit for all of your Serverless Plans.
To access this information you’ll need to click through to each serverless cluster, make a note of the spend limit, repeat for however many serverless clusters you have running, and then add them up yourself.
You’ll of course need to ensure you’re logged in and/or have set up user accounts for any members of your organization that might need access to this information.
Naturally you won’t want just anybody poking around in the CockroachDB Cloud Console!
Once logged in, any user could in theory delete a Database or Cluster which, I imagine, could be quite problematic!
… and so it goes, only those with permission to access the CockroachDB Cloud Console can get at what might actually be some really useful information.
Scenario A
In the case of total spend, imagine “Scenario A” where a Marketing Exec (M) sends a Slack message to one of the Engineering team (James):
Scenario B
Now imagine “Scenario B” Where you’ve built a fully custom application using the CockroachDB Cloud API.
Whilst this conversation is completely fictional, it’s entirely plausible, and if you’ve worked in tech for longer than a day you’ll have likely run into situations like this where even the simplest of tasks seems to take much longer than you’d imagined.
Building a custom application might sound like a lot of work but, to give you an idea of the effort required, I designed and developed this demo application in 8 days.
Prototype Endpoints: 1 Day
Design: 2 Days
Development: 5 Days
Hopefully you’ll see that building something custom using the CockroachDB Cloud API is a pretty light lift, but it could land in a big way if you design it around the needs of your business.
The demo application explained
As I mentioned before, granting access to CockroachDB Cloud Console might be more trouble than it’s worth, but I too faced this dilemma when building this demo application.
I wanted to demonstrate what you can do with the CockroachDB Cloud API but I didn’t want you (dear reader) to have access to potentially destructive functionality. Namely, deleting my demo clusters and databases, or increasing the spend limits.
I could have locked the entire app down behind a protected sign in screen, but that wouldn’t have made for a very good demo if, when you click the link, you’re hit with a sign in prompt, and can’t actually see the application.
So here’s what I did instead.
Conditional access with NextAuth.js
CockroachDB Cloud Console has two types of roles, Admin and Developer. Whilst Developer roles are limited, they can still perform potentially damaging actions but, building a custom application with the CockroachDB Cloud API and a custom Auth solution could mean you can determine a more fine grained set of actions that people within your organization can perform and what type of information you want to reveal, versus keeping super secret.
All of the GET API endpoints used in my demo application are read only, and it’s fine for this information to be surfaced publicly without violating the rules of his majesty’s secret service, but the POST and PATCH endpoints, responsible for performing mutations are only enabled for me.
Here’s a screenshot of the app’s Home screen which answers M’s question from the fictional scenario above.
The app home screen displays more than just the total spend. It also displays a Donut chart that highlights the state of your clusters, and more detailed information further down the page that also act as links to the individual Cluster pages.
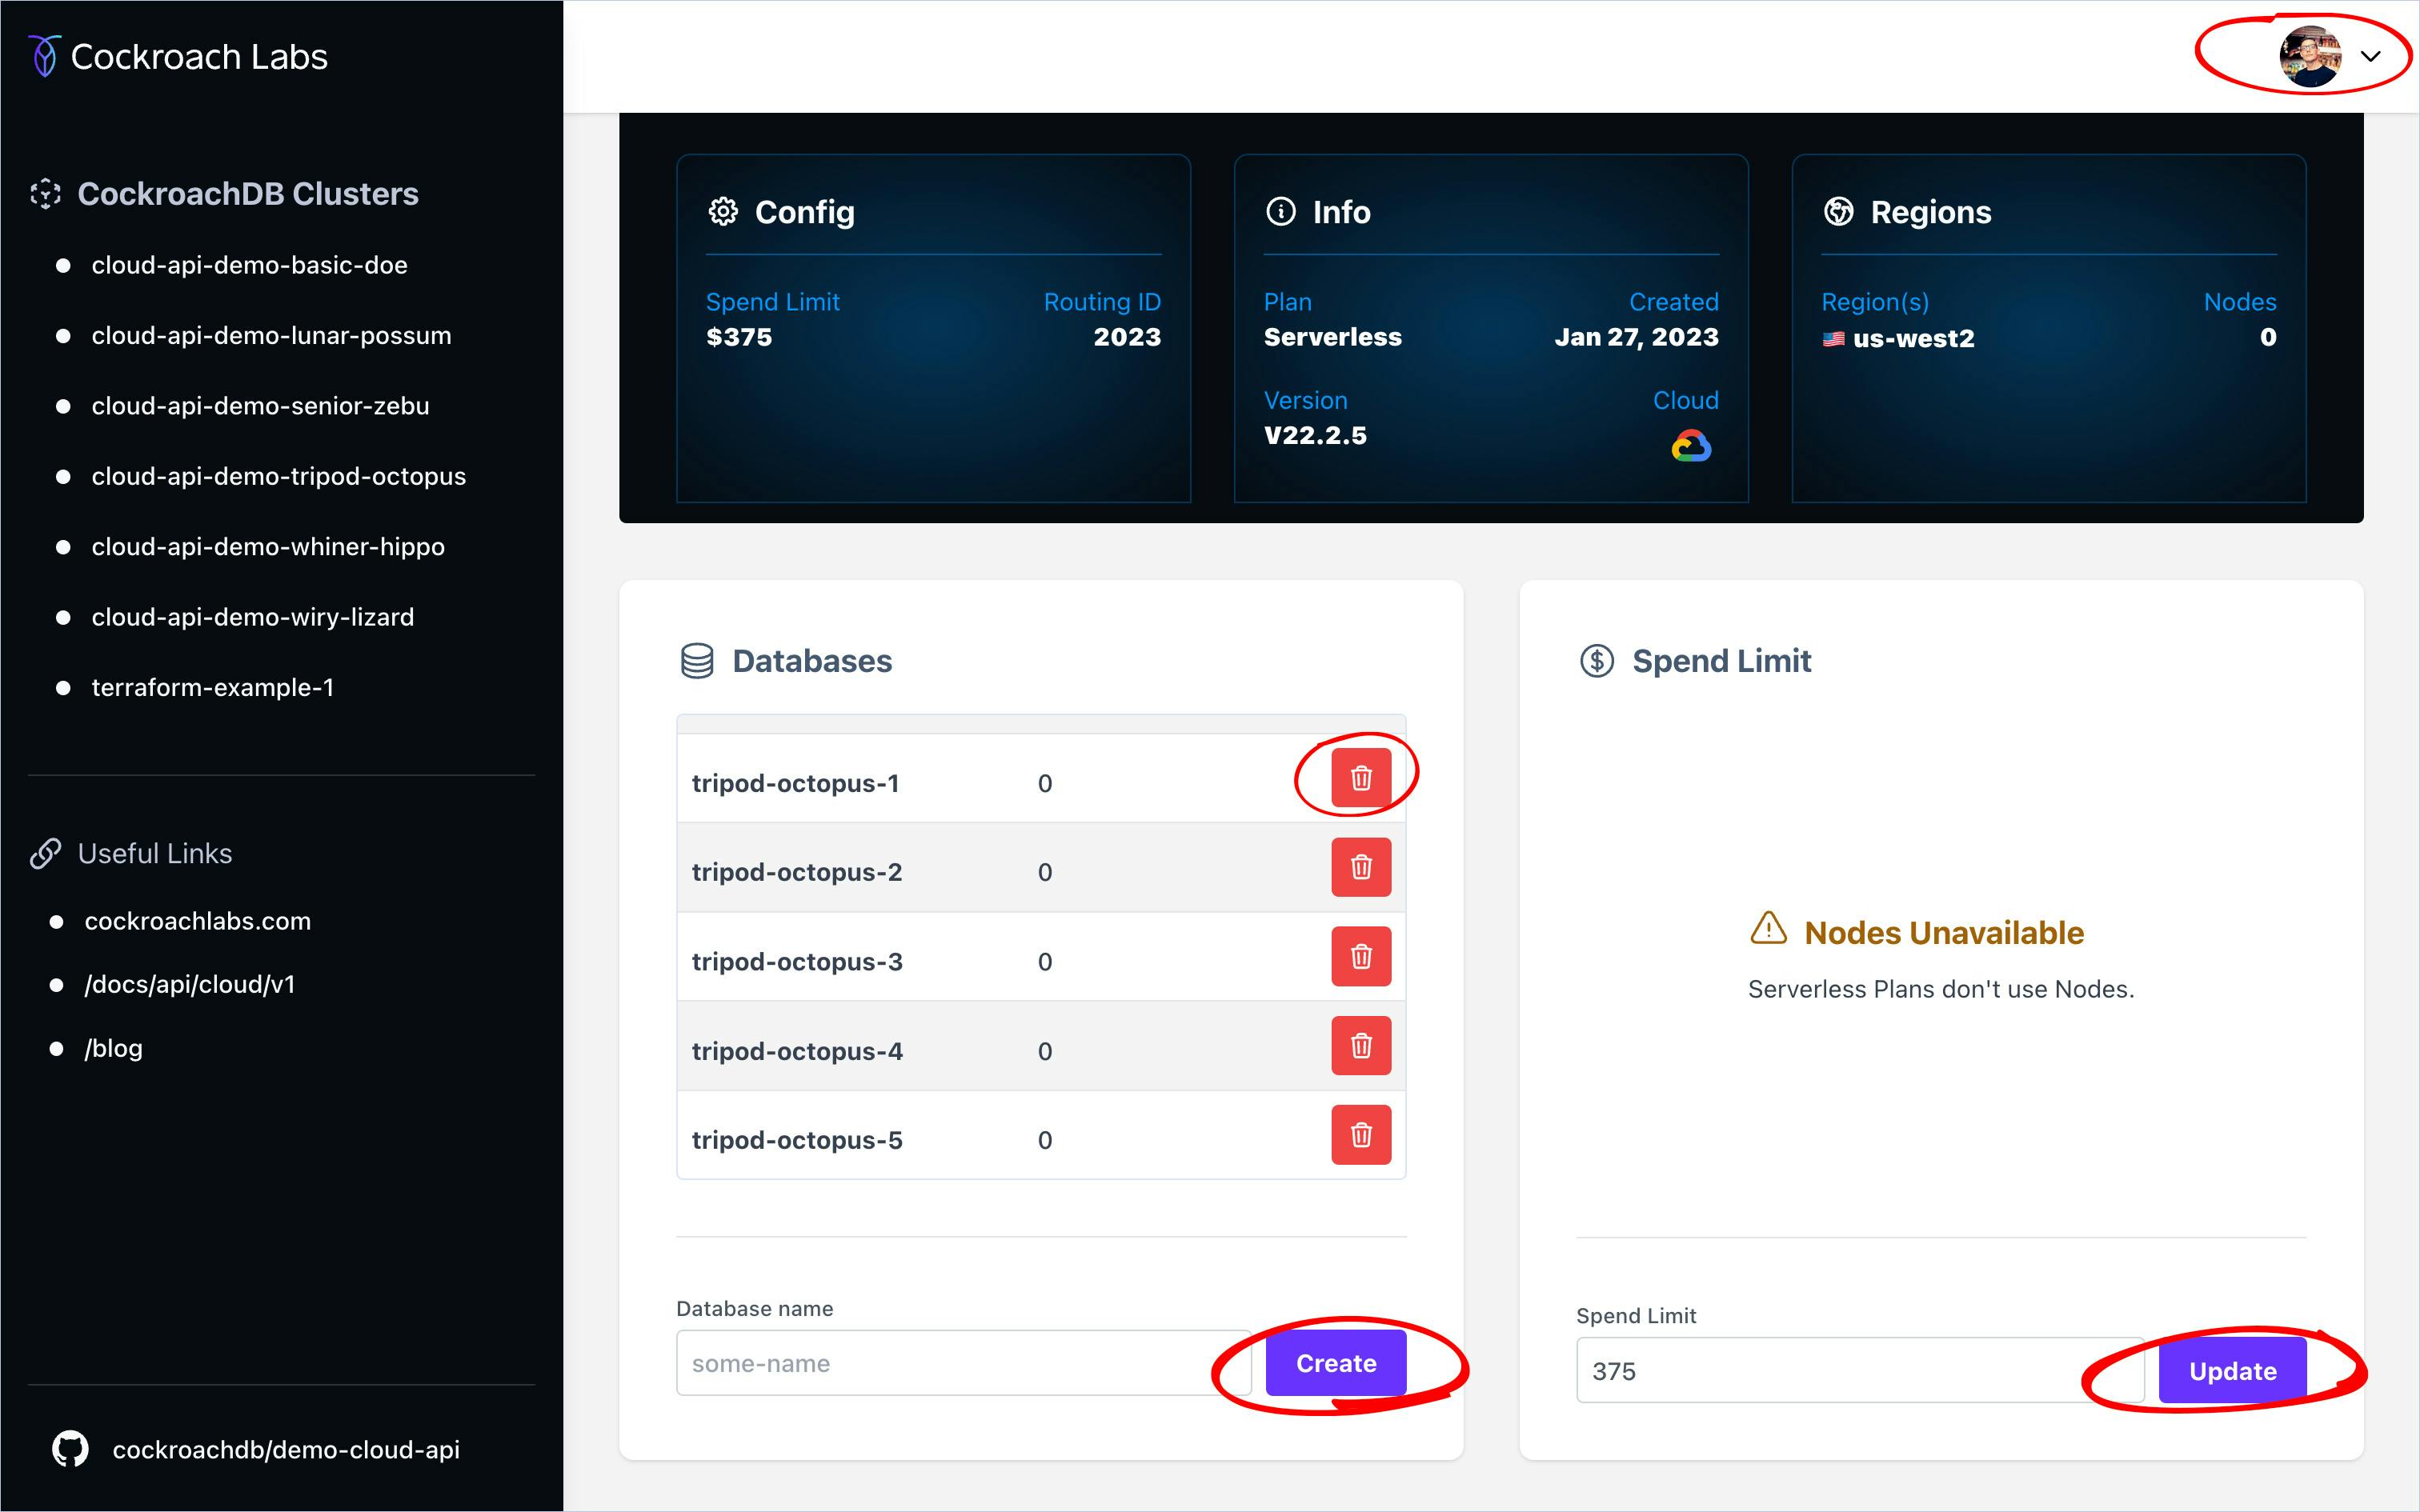
As for the POST and PATCH endpoints, these are locked down behind both, authentication and authorization!
I achieved this by using NextAuth.js and the GitHub oAuth Provider, and here’s how it works.
If you’re not signed in with GitHub, or you are, but the email address associated with your GitHub account isn’t the same as the secret email address I’ve defined in a server-side only environment variable, you’ll be given the credentials of admin: false.
If you are signed in, and you are me, you’ll be given the credentials of admin: true. Using this value within the application I’m able to enable or disable certain functionality.
If you’re not me
On each of the individual Cluster pages you’ll see something like this. Notice the buttons are grayed out, and all have the HTML attribute of disabled.
If you’re me
If you’re signed in and you’re me, you’d see something like this.
Here’s a quick video demonstration from
creating, and deleting a database and updating a spend limit.This kind of conditional authorization means that all the important, or potentially destructive functionality can be restricted to only those who need it whilst the rest of the information can be accessed by anyone with a link to the application.
The auth rules I’ve setup for this application might not be what you’re looking for but most auth libraries can provide utilities for working with a number of authentication providers. It might be more suitable to use the Google Provider and grant access to folks with @yourcompanyname.com in their Google account. I’ve used this in the past for internal applications with another solution called auth0 and it worked really well.
It’s my hope that by using the CockroachDB Cloud API you could build something that will help iron out some of those oh so typical organizational sticking points, and get you one step closer to operational efficiency.
There’s every chance my demo application won’t suit your needs, but that’s ok! With the CockroachDB Cloud API you can build any kind of application to perform any number of tasks.
What you build is completely up to you and I look forward to seeing what you come up with!
… but wait, there’s more!
The demo application I’ve built mainly deals with the consumption and presentation of your CockroachDB Clusters. This next part explains how you can configure and manage your Clusters using our Terraform integration.
CockroachDB Terraform integration
If you’re familiar with Git workflows and/or CI/CD pipeline configurations Terraform is very similar.
The general idea is this. You write some config code, usually in .yaml or .toml which configures something somewhere else in your infrastructure. It’s the same deal with Terraform, only this time you’ll write your config using the .tf file format. The .tf format is Terraform specific but all the same principles apply. Write some configuration in a declarative way, commit the changes, create a PR, seek reviews / approval, then merge to apply the changes.
Making changes to your CockroachDB Clusters using Terraform means you’re not directly interacting with the CockroachDB Cloud API, but more crucially, when combined with a Git workflow you can more easily manage and track changes, which isn’t really possible through the click of a button in a user interface.
Getting started with Terraform
There’s a few prerequisites before you get going, here’s my process for getting up and running on mac OS.
With all of the above installed you can now create your first Terraform configuration repository.
I’ve created a simplified version on my personal GitHub account which you can see on the following link.
Inside the repository you’ll find: main.tf and a terraform.tfvars.
main.tf
This file contains all the available commands that can be used, and maps the Terraform syntax back to the CockroachDB Cloud API endpoints. Here’s a bit more of an explanation.
Terraform Syntax
resource "cockroach_cluster" "example" {
  name           = var.cluster_name
  cloud_provider = var.cloud_provider
  serverless = {
    spend_limit = var.serverless_spend_limit
  }
  regions = [for r in var.cloud_provider_regions : { name = r }]
}
The above snippet would be the equivalent of this cURL.
cURL Syntax
curl --request POST \
  --url https://cockroachlabs.cloud/api/v1/clusters \
  --header 'Authorization: Bearer 'REPLACE WITH API KEY' \
  --header 'content-type: application/json' \
  --data '
	{"name":"REPLACE WITH CLUSTER NAME",
	"provider":"REPLACE WITH PROVIDER",
	"spec":{"serverless":{
	   "regions":["REPLACE WITH REGION"],
	   "spend_limit"REPLACE WITH SPEND LIMIT
	   }
	  }
	}'
Or this Fetch.
Fetch Syntax
await fetch(`https://cockroachlabs.cloud/api/v1/clusters`, {
  method: 'POST',
  headers: {
    Authorization: `Bearer `${REPLACE WITH API KEY}`
    'Content-Type': 'application/json'
  },
  body: JSON.stringify({
    name: 'REPLACE WITH NAME',
    provider: 'REPLACE WITH PROVIDER',
    spec: {
      serverless: {
        regions: ['REPLACE WITH REGIONS'],
        spend_limit: REPLACE WITH SPEND LIMIT
      }
    }
  })
})
As you can see the various ways to interact with the CockroachDB Cloud API are much of a muchness, but with the cURL or Fetch methods there’s no real way to know who did what, when, or what the resulting effect would be.
With Terraform, you can!
terrafrom.tfvars
You’ll see in my simplified version there’s another file called terraform.tfvars. This file can be updated and version controlled.
I’ve created a PR to show the changes I’d like to make to my configuration here: chore/update-spend-limit #6, and here’s the diff.
cluster_name = "cloud-api-demo-terraform"
sql_user_name = "Paul"
sql_user_password = "Pa$$worD_123"
- serverless_spend_limit = "0"
+ serverless_spend_limit = "100"
Using a Git workflow in this way means you can request for review before committing the change. This gives your team the opportunity to check if the configuration is correct and you can clearly see who is making the change, when, and in some cases you could even revert to a previous configuration.
And this can all be tracked using something like GitHub!
So there you have it, there’s multiple ways you can use the CockroachDB Cloud API and so many things you could do with it! If you’re building something cool, please let me know, you can find me on Twitter here:
See you around the internet!
Paul.


